The Secret to Perfectly Chewy Homemade Granola Bars
There’s a unique satisfaction that comes with crafting a wholesome snack right in your own kitchen. While store-bought granola bars offer convenience, they often come with a hefty price tag and a list of ingredients you might not recognize. Enter the humble, yet mighty,
homemade granola bar. Not only are they incredibly simple to make, but they also boast a delectable chewiness that often eludes their mass-produced counterparts. Forget dry, crumbly, or rock-hard bars – we're about to unlock the "secret" to achieving that perfect texture every single time.
Imagine a satisfying snack that's ready in minutes, requires no baking, and uses just a handful of pantry staples. That's the promise of these incredible
Homemade Granola Bars: Chewy, No-Bake & Kid-Friendly. They're ideal for lunchboxes, quick breakfasts, after-school fuel, or a grab-and-go energy boost during a busy day. Once you master this simple recipe, you'll wonder why you ever bought them from the store.
Why Homemade Granola Bars Are a Game-Changer
Making your own granola bars isn't just a fun kitchen project; it's a smart lifestyle choice. The benefits extend far beyond just taste, touching on affordability, health, and even family engagement.
*
Unbeatable Affordability: Those individually wrapped bars at the grocery store add up quickly. By using budget-friendly ingredients like oats, peanut butter, and honey, you can drastically reduce your snack budget. This makes them an excellent choice for
Affordable & Healthy Homemade Granola Bars for Meal Prep, ensuring you always have a wholesome option on hand without breaking the bank.
*
Complete Ingredient Control: One of the biggest advantages of homemade snacks is knowing exactly what goes into them. You dictate the quality and quantity of sweeteners, avoid artificial flavors and preservatives, and can easily cater to specific dietary needs or preferences. This transparency brings peace of mind, especially when preparing snacks for your family.
*
Customization Galore: While the base recipe is fantastic on its own, homemade granola bars are a blank canvas for creativity. Whether you're a fan of chocolate, nuts, seeds, or dried fruit, you can tailor each batch to your exact liking. This versatility means you'll never get bored and can always surprise your taste buds.
*
Empowering and Engaging: There's a certain satisfaction in creating something delicious from scratch. This recipe is so straightforward that it's perfect for involving kids in the kitchen. They'll love helping to mix, press, and choose their favorite add-ins, making it a fun family activity and fostering an appreciation for homemade food.
The "Secret" to Perfectly Chewy Granola Bars: Beyond Just Ingredients
Many recipes for
homemade granola bars use similar ingredients: oats, nut butter, and a liquid sweetener. Yet, some turn out perfectly chewy, while others crumble into expensive trail mix or harden into unappetizing bricks. The true secret isn't a magical ingredient; it lies in mastering two critical elements: the
wet-to-dry ratio and the
pressing technique. Get these right, and you’ll achieve consistent, sliceable, and wonderfully chewy bars every time.
Mastering the Wet-to-Dry Ratio for Unbeatable Chewiness
The balance between your dry ingredients (oats, mix-ins) and your wet binders (nut butter, honey, brown sugar) is paramount.
*
Too Dry: If there isn't enough wet binder, the oats won't properly adhere. The mixture will feel crumbly and loose, making it difficult to press into a cohesive bar. The resulting bars will fall apart the moment you pick them up.
*
Too Wet: Conversely, an excess of liquid sweetener or nut butter can lead to a mixture that's overly sticky. While it might hold together, it could result in bars that become rock-hard once chilled or excessively soft and greasy at room temperature.
*
The Sweet Spot: Aim for a consistency that resembles stiff cookie dough or play-dough. It should be moist enough to hold its shape when squeezed but not so wet that it feels gooey or leaves a heavy residue on your hands. If your mixture feels too dry, add a small amount (start with a tablespoon) of extra honey or nut butter until the desired consistency is achieved. If it feels too wet, a tablespoon or two of extra oats can help absorb some moisture. This "feel" is what truly elevates a good recipe to a great one.
The Art of Pressing: Avoiding Crumbles and Bricks
Once you have the perfect wet-to-dry ratio, how you press the mixture makes all the difference in the final texture and stability of your
homemade granola bars.
*
Even Distribution: First, spread the mixture evenly into your prepared pan. This ensures uniform thickness and consistent texture throughout the batch.
*
Firm and Compact: This is where many go wrong. You need to press the mixture *very firmly* into the pan. Don't just pat it down gently; really lean into it. The goal is to eliminate as many air pockets as possible, creating a dense, compact mass that will hold together beautifully once chilled. A great trick is to use the flat bottom of a measuring cup, a clean drinking glass, or even a spatula to apply even, strong pressure across the entire surface.
*
The "Why": Pressing firmly ensures that every oat particle is in close contact with the binders. This maximizes surface adhesion and minimizes spaces where the bars could break apart. It's the secret to those clean, sturdy slices that won't disintegrate in your lunch bag.
Essential Ingredients for Your Granola Bar Masterpiece
While the technique is key, the ingredients form the delicious foundation of your
homemade granola bars. Here's a breakdown of the core components and why they work:
*
Quick Cooking Oats: These are the star of the show. Quick oats are pre-steamed and cut into smaller pieces, allowing them to absorb moisture more readily and contribute to a softer, chewier bar. While old-fashioned (rolled) oats can be used, they tend to yield a chewier texture with more "bite" and might require slightly more binder or chilling time to achieve optimal cohesion.
*
Peanut Butter (or Other Nut Butter): This powerhouse ingredient serves multiple crucial roles. It's a primary binder, helping all the ingredients stick together. It also adds a rich flavor, a creamy texture, and a significant boost of protein, making the bars more satisfying. Creamy peanut butter creates a very cohesive, smooth bar, but crunchy peanut butter can add a delightful textural contrast. Feel free to experiment with natural peanut butter, almond butter, cashew butter, or even sunflower seed butter for nut-free options – just ensure they are well-stirred before adding, especially natural varieties where oil can separate.
*
Honey: The second essential binder and primary liquid sweetener. Honey provides a natural, floral sweetness and its sticky consistency is perfect for holding everything in place. Maple syrup can be a great alternative if you prefer a different flavor profile or for a vegan option (though ensure other ingredients are also vegan-friendly).
*
Brown Sugar: Beyond just adding a delicious caramelly sweetness, brown sugar plays a vital role in the texture. Its molasses content helps to keep the bars moist and soft, preventing them from becoming brittle or hard over time. It complements the honey beautifully, creating a well-rounded sweetness.
*
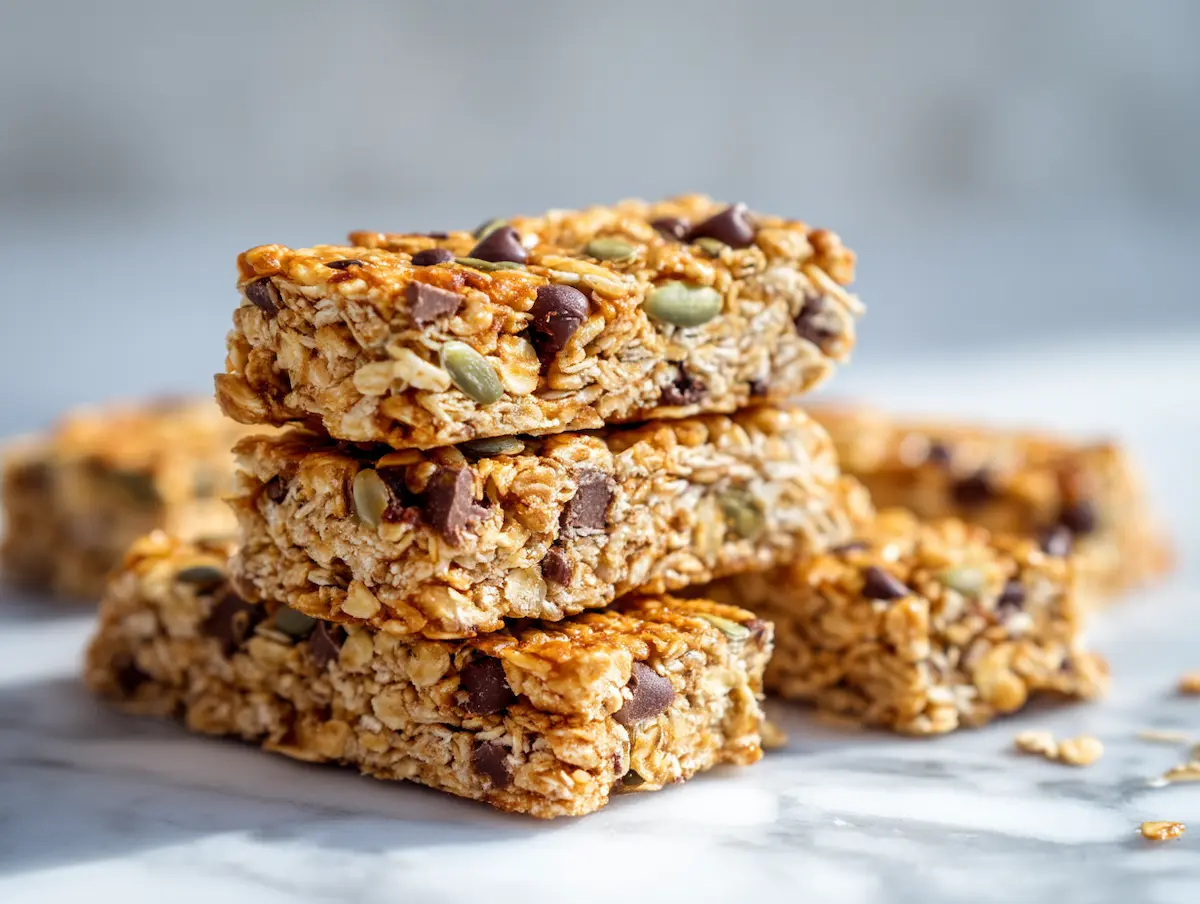
Mini Chocolate Chips: These tiny morsels are fantastic for even distribution, ensuring a bit of chocolatey goodness in every bite. Smaller pieces also integrate better into the mixture, helping the bars maintain their structure. If you only have larger chocolate chips or a chocolate bar, simply chop them into smaller pieces. For a fun twist, mini M&Ms can add a pop of color and extra sweetness.
Creative Add-Ins and Flavor Variations
Once you’ve mastered the basic recipe, the fun truly begins with customization. The beauty of
homemade granola bars is their adaptability. You can transform them into endless flavor combinations by adding various pantry staples.
*
Nuts and Seeds: Chopped almonds, walnuts, pecans, cashews, pumpkin seeds, sunflower seeds, chia seeds, or flax seeds all add healthy fats, protein, fiber, and a satisfying crunch.
*
Dried Fruit: Sweet and chewy, dried cranberries, raisins, chopped apricots, dates, cherries, or mango can add natural sweetness and vibrant flavor.
*
Shredded Coconut: Toasted or untoasted, coconut adds a delightful tropical flavor and texture.
*
Spices: A pinch of cinnamon, nutmeg, or even a touch of ginger can elevate the flavor profile.
*
Citrus Zest: A little orange or lemon zest can add a bright, fresh note.
When adding extras, a good rule of thumb is to keep the total amount around 1/2 to 3/4 cup. Exceeding this can dilute the binders, making the mixture too dry and less cohesive. Experiment to find your favorite combinations, remembering that balance is key to maintaining that perfect chewy texture. For example, a batch with dried cranberries, chopped walnuts, and a hint of orange zest is wonderfully festive, while a mix of mini chocolate chips and shredded coconut offers a classic treat.
Pro Tips for Granola Bar Success
To ensure your
homemade granola bars turn out perfectly every time, keep these expert tips in mind:
1.
Make it Part of Your Meal Prep: These bars are ideal for weekly meal prep. Even if you haven't finished your previous batch, prepare another so you always have this nutritious snack readily available. They store wonderfully!
2.
Patience During Chilling: This is non-negotiable! While it's tempting to cut into them immediately, the chilling time is crucial for the bars to set and become firm enough to slice cleanly without crumbling. Allow them at least 1-2 hours in the refrigerator, or for a quicker set, 30-45 minutes in the freezer. The colder they are, the cleaner your cuts will be, and the sturdier your bars will feel.
3.
Optimal Pressing: As discussed, firmly pressing the mixture into the pan is essential. Using the bottom of a measuring cup, a clean glass, or a sturdy spatula helps you apply even pressure, creating a compact and cohesive base for your bars. Don't be afraid to put some muscle into it!
4.
Adjusting the Bind: If, after mixing, your granola bar mixture still feels too crumbly and doesn't hold together when squeezed, it likely needs more binder. Add an extra tablespoon of honey or nut butter, mix well, and test the consistency again. Repeat until it reaches that perfect, pliable, play-dough-like texture.
5.
Storage Savvy: Store your finished granola bars in an airtight container. They will keep well at room temperature for up to a week, or in the refrigerator for up to two weeks for extended freshness and a firmer chew. For even longer storage, wrap individual bars in parchment paper or plastic wrap and freeze them for up to 3 months. Thaw at room temperature for a quick snack.
Taking granola bars off your grocery list permanently is easier than you think. With these tips and the "secret" of technique, you'll be whipping up batches of perfectly chewy, delicious, and budget-friendly
homemade granola bars that your whole family will love. Enjoy the satisfaction of making your own wholesome snacks, tailored precisely to your taste!